LoRa
How to set up your LoRa devices
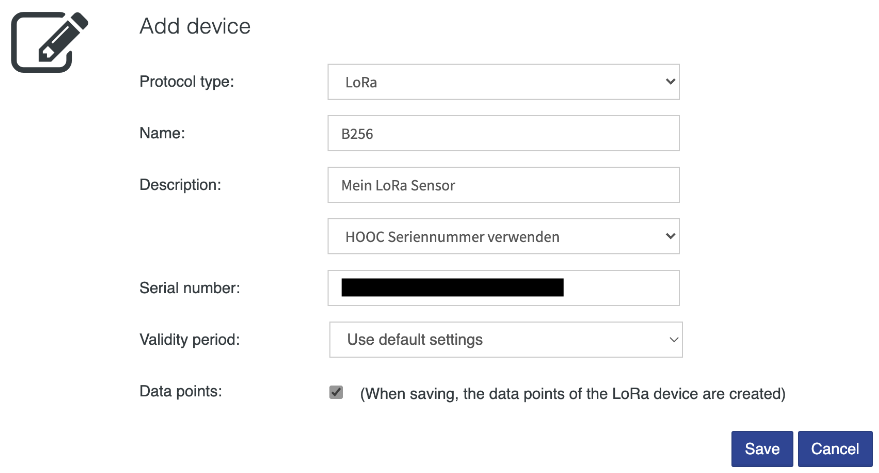
By clicking on the icon, a new LoRa device can be entered.
| Property | Description |
|---|---|
| Protocol type | Select LoRa |
| Name | Enter the name of the device |
| Description | Specify the description of the device |
| Serial number / DevEUI | Enter the serial number or DevEUI of the LoRa device |
| Validity period | If in the predefined interval no value update is received, the corresponding data point will be marked as invalid (last known value) |
| Data points | If this field is checked, the data points of the LoRa device as well as the Smart UI settings will be created automatically |
Monitoring
For LoRa devices, the received packets are displayed.
Actions
The setup of the LoRa device allows a number of possible actions.

| Action | Description |
|---|---|
| Edit device settings | |
| Export data points (if data points are available) | |
| Import data points (if no data points are available) | |
| Show LoRa packet monitor | |
| Show LoRa packet logs | |
| Remove device (if no data points are recorded) |
Packet monitor / Packet logs
The data received from the sensor(s) are directly displayed in the LoRa packet monitor and the packet logs. The following is a description of the parameters.
RSSI
The Received Signal Strength Indication (RSSI) indicates how well a receiver can “hear” a signal from a transmitter (sensor).
- The RSSI is measured in dBm (negative value).
- The closer to 0, the better is the signal.
- The signal is strong if the RSSI is -30dBm.
- The signal is weak if the RSSI is -120dBm.
Spreading Factor
Based on the environmental conditions between sensor and gateway, the LoRa network server defines the spreading factor (between 7-12). The spreading factor determines how many chirps (packets) are sent per second. This requires that the Adaptive Data Rate feature is turned on (recommended for all devices, except for those constantly in motion). The LoRa sensors provided by HOOC have – unless otherwise specified – the Adaptive Data Rate feature already turned on.
The higher the spreading factor, the more time is required for the data transmission. And the longer the transmission time, the more energy will be consumed.
Data points
The live values of the acquired data points are automatically displayed. By clicking on the icon, you can stop the data monitor.
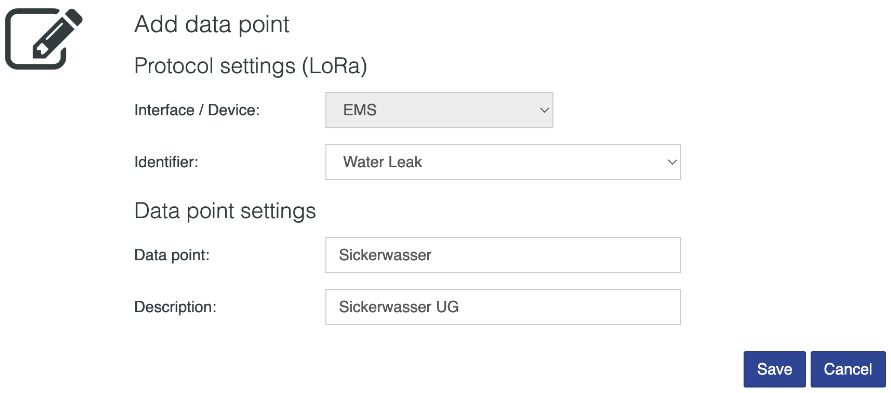
By clicking on the icon, a new data point can be created for the corresponding interface.
| Property | Description |
|---|---|
| Identifier | Select the data point |
| Data point | Enter the name of the data point |
| Description | Specify the description of the data point |
Actions
The setup of the data point allows a number of possible actions.

| Action | Description |
|---|---|
| Edit data point settings | |
| Edit Smart UI settings | |
| Show data point trend | |
| Write data point (if writeable) | |
| Remove data point |